




- Published on: 2026-11-08 18:17:46
First live trade checklist for beginners: check risk, liquidity, and room

A chart can look ready, yet the trade may have little room to move. A first live trade checklist for beginners should start with liquidity: check trading activity and the spread, and pass if entering or exiting cleanly looks difficult. Then confirm market conditions, a valid trigger, space to the next obstacle, and a stop and position size that match your risk plan.
It’s natural to focus on the entry, but the setup is only one part of the decision. A checklist turns the rest into deliberate checks, helping you avoid chasing a move or sizing a position before you know where the trade idea is wrong. A well-built checklist should take about 30-90 seconds to run.
Adapt your checks to the asset class, since liquidity, trading hours, volatility, and execution risks vary across markets. This guide explains how to assess each factor, place a stop where your idea is invalidated, calculate position size, and decide whether a trade has enough room to justify entering live.
Key Takeaways
- Separate your trading plan from the pre-entry checklist: the plan defines your approach, while the checklist tests whether this setup meets it.
- Set the stop where the trade idea is invalidated, then size the position using the distance between entry and stop.
- Wait for a clear trigger and enough space to the next obstacle instead of chasing an extended move.
- Read market structure across timeframes to distinguish a trend from sideways conditions and judge whether the setup aligns with the broader move.
- Adapt your checks to the asset class, including its trading hours, liquidity, volatility, and any holding costs that apply.
Stop-loss placement and position sizing
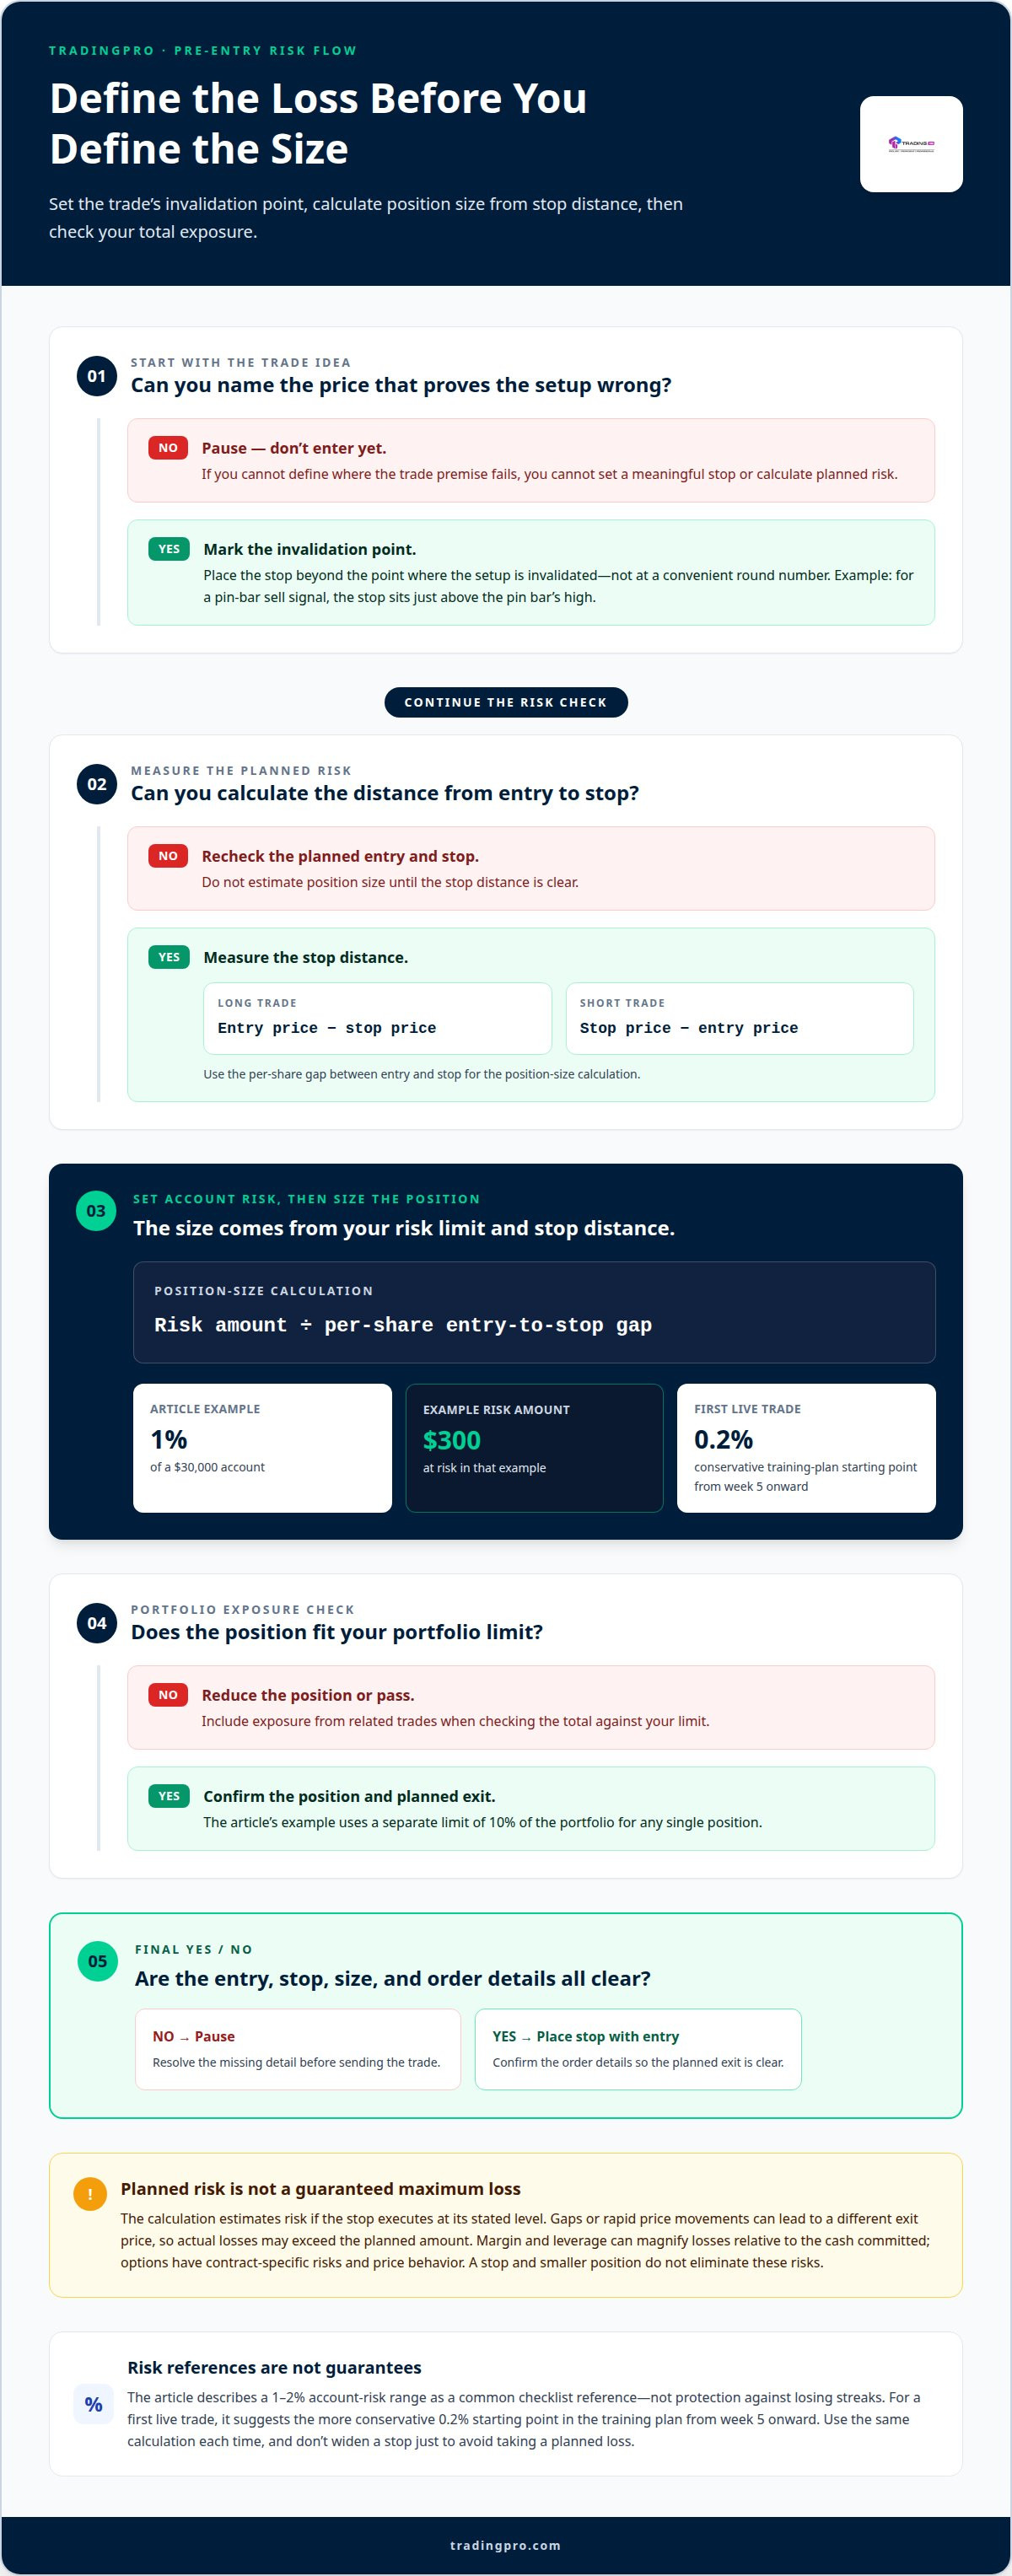
Before entering, define the price that would prove your trade idea wrong. Place the stop where the setup is invalidated, not at a convenient round number. For a pin-bar sell signal, for example, the stop sits just above the pin bar’s high. This ties the exit to the pattern rather than to discomfort with ordinary price movement.
Margin and leverage can magnify losses relative to the cash committed, while options carry contract-specific risks and price behavior. Understand how the instrument can affect potential losses before using it. A stop and smaller position do not eliminate those risks.
Use this sequence for each position:
- Mark the invalidation point. Identify the price where the trade premise fails, then place the stop beyond that point.
- Measure the stop distance. Subtract the stop price from the planned entry for a long trade; reverse the subtraction for a short trade.
- Set the account-risk amount. The example uses 1% risk on a $30,000 account, which puts $300 at risk.
- Calculate position size. Divide the risk amount by the per-share gap between entry and stop.
- Check the portfolio exposure. Keep the total position within your portfolio limit, including exposure from related trades.
- Place the stop with the entry. Confirm the order details before sending the trade, so the planned exit is clear.
This calculation estimates planned risk if the stop executes at its stated level. Gaps or rapid price movements can lead to a different exit price, so actual losses may exceed the planned amount.
Account risk and position size are related, but they are not interchangeable. A small-looking position can still carry substantial risk when its stop is far away. A large position can fit a defined risk limit when the stop distance is narrow, though execution conditions still matter. The 1-2% account-risk range is a common checklist reference, not a guarantee against losing streaks. A separate rule in the example limits any single position to 10% of the portfolio.
For a first live trade, consider the more conservative 0.2% account-risk starting point in the training plan from week 5 onward. Use the same calculation each time, and don’t widen a stop merely to avoid taking a planned loss. Record the entry, stop, position size, and reason. Reviewing those details helps distinguish a poor setup from a failure of discipline, even when momentum or familiar patterns tempt you to run through the checklist.
What is a trading checklist?
A trading checklist is a short framework for making the same decision before each entry. It tests whether an opportunity meets your rules; it doesn’t replace a trading plan or daily routine. A plan defines your setup, risk boundaries, and exit approach. A routine organizes preparation and review. A checklist applies both to one trade. A well-built version can take 30-90 seconds to run.
For stocks, screen for liquidity before studying a pattern. One checklist reference is average trading volume of at least 1 million shares per day for most traders, using the previous five days to calculate the average. Then examine price structure, support and resistance, and whether a pullback or breakout fits your plan. Compare potential reward with the distance to nearby obstacles. Avoid choosing an asset solely because its chart looks active.
Beginners can rehearse their framework before going live. A 30-day training plan starts with reviewing 50 historical charts in week one, then scanning 20-30 charts each morning during weeks two and three. Paper trading can help test whether entry, exit, and recording steps are clear, though simulated decisions don’t fully reproduce live execution. Try running the same short checklist before every entry for two weeks, then review where you hesitated or skipped a rule.
Use four phases to keep the process focused:
- Prepare: Check the trading session, scheduled events, and whether your setup is allowed by your plan.
- Select: Assess liquidity, market direction, support or resistance, and the pattern’s fit.
- Enter: Confirm the trigger, position size, and planned exits before placing the order.
- Review: Record the result, execution quality, and one lesson after the trade closes.
After placing a trade, leave the planned stop and target in place unless your strategy defines a specific adjustment. Log the completed trade within 10 minutes, save a screenshot, and write one sentence explaining the entry. Grade your execution honestly and record one lesson. Review setup performance over a rolling 20 trades to spot patterns, not to judge one result alone.
Set-and-forget means deciding your exit rules before entry, not ignoring risk. If price reaches a planned level, let the defined order or rule guide the next step rather than reacting to every tick. A daily routine can support that discipline; one trader described using the same routine for more than 10 years. Once your practice framework is ready, you can begin setting up a trading account.
For breakout checks, require volume above 150% of the 20-period average. Analyze the daily chart for support and resistance, market conditions, and price-action signals.
“Room” check: does the trade have space to work?
Before entering, map the path from your trigger to the next obstacle. A breakout may be valid but offer little room if resistance is close overhead. Mark nearby swing highs, support, resistance, and session levels on your charts. Compare the available distance with your planned stop and target. If the next barrier leaves too little potential reward for your strategy, skip the setup instead of forcing an entry.
Use these checks to assess timing and trade space:
- Wait for a defined trigger. A setup is not an entry until price confirms the condition your strategy requires.
- Check nearby resistance or support. A ceiling close above a long entry, or a floor near a short entry, can limit movement.
- Look for a breakout retest. Waiting for price to break a level and test it again can help avoid chasing an extended move.
- Measure remaining movement. Compare the distance to the next obstacle against the stop distance and planned reward.
- Skip an exhausted move. Three large green days before a breakout can signal that much of the immediate move has already occurred.
For example, a chart may show price pulling back to resistance at the 21 EMA and the 1.1250 horizontal level. Treat those as decision points, not automatic entry signals. Wait for the trigger defined by your plan, then check whether price has space beyond that level. For an index opening-range setup, the example trigger is a five-minute candle close above the range high. Without that close, the breakout condition has not appeared.
Market, limit, and stop orders work differently. A market order seeks execution at available prices, a limit order sets a price boundary for buying or selling, and a stop order activates when its trigger price is reached. Each type affects execution differently, so match the order to your entry plan and understand how it works before submitting it.
Watch for red flags that can turn a promising breakout into a poor-timed trade. If the move has already stretched far from its base, chasing may leave little room before resistance. In the AAOI example, the stock had used $17 of its average true range that morning, while its average true range was $13.25 that Friday morning. That comparison illustrates why remaining movement matters: a move may already exceed its typical range. Don’t treat an indicator as a guaranteed reversal signal; use it alongside structure and the actual trigger.
Define invalidation before entry. If price breaks the level that supports your setup, the original idea may no longer apply. A trade can still lose, but a clear trigger, retest, and exit condition keep your decision tied to the plan rather than hope. Take only setups with a visible trigger and enough room to develop.
Identifying trending or sideways conditions
Classify the market before choosing a setup. A trending market makes directional progress, while a sideways market moves between established support and resistance. The same entry pattern can behave differently in each condition. Start with the daily chart, then compare it with the weekly and monthly structure. This broader view helps distinguish a meaningful move from short-term volatility.
Use this checklist to label the market condition before planning an entry:
- Mark swing highs and lows on the daily chart. Rising highs and lows suggest an uptrend, while falling highs and lows suggest a downtrend.
- Check whether price is moving between clear boundaries. Repeated reversals around similar support and resistance levels indicate a sideways range.
- Compare the setup with broader structure. Weekly and monthly charts can reveal whether a daily entry follows or opposes the larger direction.
- Use moving averages as context, not entry signals. The checklist includes the 50 SMA, 100 SMA, and 200 SMA to help frame price direction.
- Assess near-term momentum with the 21 EMA. Its position and slope can help show whether short-term movement supports the broader trend.
- Check price against the Ichimoku Cloud. When price is above the cloud, the indicator tends to act as support.
Trend alignment matters because a setup’s context changes its odds. The stated comparison gives trend-aligned setups a 60-70% win rate, versus 30-40% for the same setup against the trend. Treat those figures as context, not a promise about your next trade. A single outcome depends on the setup and execution, and past results don’t determine an individual entry.
In a sideways market, don’t treat every test of resistance as a breakout. Identify the range boundaries first, then wait for the trigger your strategy requires. A false break that quickly returns inside the range can invalidate a breakout idea. In a trending market, look for entries that fit the direction and structure instead of assuming every pullback signals a reversal.
Volatility adds another layer. A sharp move can make a chart look as if it is trending, even when price remains inside a wider range. Before acting, check where the move sits relative to recent highs and lows and the larger chart structure. If conditions are mixed, note the uncertainty in your checklist and wait for clearer structure rather than forcing an entry.
Review the market condition again before execution. If price breaks a key swing level or returns to a range, reassess whether the original setup still applies. This can help you avoid trading a trend strategy in sideways conditions, or a range strategy during a directional move. Consistent classification gives every entry a defined market context.
Checklist variations by asset class
Keep the core checklist, but adapt its market-specific checks. A stock, index, currency pair, and crypto future can differ in trading hours, liquidity, and price drivers. Use the relevant checks before entry rather than applying one indicator to every market. The key takeaway is to check the instrument’s own trading conditions, not just the chart pattern.
For stocks, assess liquidity and the day’s activity before choosing an entry. A checklist reference for most traders is average volume of at least 1 million shares per day, calculated across the previous five days. Compare today’s activity with that baseline. For a breakout, require a clear trigger and avoid chasing after price has already moved sharply. Also review scheduled company events and nearby resistance.
For index intraday trades, define the opening range and session boundaries. The example method marks the range using the first 15-30 minutes, then waits for its stated trigger. Set a flat-by time in advance; 3:50pm ET is one example exit time. That rule keeps an intraday position from becoming an unintended overnight trade. Review the session’s volatility before entering.
For currency pairs, include the trading session in your checklist. The London-New York overlap is a two-to-three-hour window worth tracking. Note whether your planned entry falls inside or outside that period, then assess the pair’s current price movement and spread. Don’t treat a session indicator as a signal by itself: quiet periods and fast-moving releases can create very different execution conditions.
For crypto futures, add funding to the review. Funding timing can affect holding costs, so include it in your holding plan. Check the contract’s volatility and whether your strategy allows holding through a funding event. The price chart alone won’t show every cost or condition affecting a futures position.
- Before any asset entry, check the calendar. Avoid new entries within 30 minutes before or after high-impact economic news releases.
- For equities, compare current volume with its five-day average. This helps assess whether the market activity supports your setup.
- For indices, record the opening range and exit time. A defined session plan supports disciplined execution.
- For crypto futures, account for funding timing. The rate can affect the cost of holding a position.
Build a separate checklist version for each asset class you trade. Keep the checks short, and record whether liquidity, timing, and volatility matched your expectations. To put a market-specific trading plan into practice, create a trading account.
TradingPRO
When your checklist is ready and you want to put your trading approach into practice, TradingPRO offers Rookie, Micro, Pro, and Scalp accounts, alongside Social Trading and Copy Trading. Consider which account and approach align with your markets, trading style, and risk process.
A clear checklist still matters: define your entry, stop, position size, and exit before placing a trade. Account options provide different environments for different approaches, but they don’t replace your own decisions or risk controls. If you’re ready to explore the options, contact TradingPRO to discuss your next step.
Make your next move deliberate
Your first live trade is a chance to put your process into practice, not a test of how quickly you can act. Use a first live trade checklist for beginners as a decision gate: proceed only when the setup fits your rules, and stand aside when it doesn’t. That choice is part of trading with intention.
Refine your approach through honest review. Notice which conditions help you follow your plan and where emotions affect your decisions. Over time, those observations can help make your checklist clearer and your execution more consistent. Let preparation, not urgency, set the pace.
When you’re ready to discuss your trading and take the next step, connect with TradingPRO. Build your approach with focus, keep learning from each decision, and move forward on your terms.
Frequently Asked Questions
Point 2: Is There Liquidity?
Liquidity is the ability to enter or exit without a large gap between quoted buy and sell prices. For a first live trade checklist for beginners, look beyond volume: compare the bid and ask, inspect available order-book depth, and check whether activity is steady or concentrated in brief bursts. A wide spread or thin depth can make execution less predictable. If the market looks difficult to exit, skip the entry.
What should beginners check before placing their first live trade?
Before submitting an order, confirm the instrument, direction, order type, and trading session. Check for a scheduled event that could affect the market, and make sure the symbol matches the asset you intend to trade. For example, contracts tracking similar markets may have different trading terms. Read the order preview carefully, including whether it opens or closes a position. If any detail conflicts with your plan, stop and resolve it first.
How can beginners calculate position size and maximum loss before entering a trade?
Start with the amount you’re willing to risk, then divide it by the loss per unit between entry and stop. If a trade idea becomes invalid at a defined price, the entry-to-stop distance determines risk per share or contract. Multiply that distance by your planned size to estimate the loss at the stop. Include relevant transaction costs, and remember that fast markets or gaps can make the actual exit price differ.
What risk-management rules should beginners set before their first live trade?
Write down a maximum risk per trade, a limit for combined exposure, and a rule for when to stop trading after losses. Define the exit before entering, and don’t widen it simply because price moves against you. Add a pause rule if urgency or frustration affects decisions; after consecutive losses, a 20-minute break can interrupt reactive trading. Review whether you followed the rules separately from whether the trade made money.


